
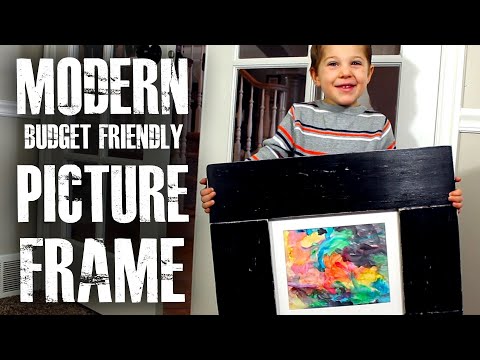
my three-year-old got into the paints again but this time you made a picture
again but this time you made a picture
again but this time you made a picture that impressed me so much I wanted to
that impressed me so much I wanted to
that impressed me so much I wanted to get it framed and hang it somewhere
get it framed and hang it somewhere
get it framed and hang it somewhere special until I realized that custom
special until I realized that custom
special until I realized that custom frames are ridiculously expensive so in
frames are ridiculously expensive so in
frames are ridiculously expensive so in this project let’s find a way to use
this project let’s find a way to use
this project let’s find a way to use this plain old wooden board to make an
this plain old wooden board to make an
this plain old wooden board to make an ostentatious picture frame that’ll keep
ostentatious picture frame that’ll keep
ostentatious picture frame that’ll keep costs low but hopefully instill a sense
costs low but hopefully instill a sense
costs low but hopefully instill a sense of accomplishment that’s priceless let’s
of accomplishment that’s priceless let’s
of accomplishment that’s priceless let’s start this project with a 6-foot length
start this project with a 6-foot length
start this project with a 6-foot length of common board I got at the hardware
of common board I got at the hardware
of common board I got at the hardware store for under $4.00 now it’s important
store for under $4.00 now it’s important
store for under $4.00 now it’s important the board is completely straight and you
the board is completely straight and you
the board is completely straight and you can check for any warping by peering
can check for any warping by peering
can check for any warping by peering straight down the top I’ll also try
straight down the top I’ll also try
straight down the top I’ll also try bordering the picture with a pre-cut
bordering the picture with a pre-cut
bordering the picture with a pre-cut matting I got from the hobby store
matting I got from the hobby store
matting I got from the hobby store because the inner edges are beveled
because the inner edges are beveled
because the inner edges are beveled which should help give the picture a
which should help give the picture a
which should help give the picture a nicer finish now the first thing we need
nicer finish now the first thing we need
nicer finish now the first thing we need to do is cut a small piece off the end
to do is cut a small piece off the end
to do is cut a small piece off the end of the board to make sure the edge is
of the board to make sure the edge is
of the board to make sure the edge is straight and clean next let’s cut two
straight and clean next let’s cut two
straight and clean next let’s cut two pieces to custom heights and by ripping
pieces to custom heights and by ripping
pieces to custom heights and by ripping the two boards at the same time you can
the two boards at the same time you can
the two boards at the same time you can see they end up exactly the same size
see they end up exactly the same size
see they end up exactly the same size the other two pieces are cut using the
the other two pieces are cut using the
the other two pieces are cut using the same method but you can see they’re
same method but you can see they’re
same method but you can see they’re quite a bit longer and that’s because
quite a bit longer and that’s because
quite a bit longer and that’s because the frame is pretty thick and these are
the frame is pretty thick and these are
the frame is pretty thick and these are going to form the top and bottom okay we
going to form the top and bottom okay we
going to form the top and bottom okay we need to wait a fastness together and I’m
need to wait a fastness together and I’m
need to wait a fastness together and I’m going to try using a mini pocket hole
going to try using a mini pocket hole
going to try using a mini pocket hole jig this is simply clamped to the end of
jig this is simply clamped to the end of
jig this is simply clamped to the end of the board and allows us to cut a
the board and allows us to cut a
the board and allows us to cut a diagonal hole at about a 15 degree angle
diagonal hole at about a 15 degree angle
diagonal hole at about a 15 degree angle you could try drilling without the jig
you could try drilling without the jig
you could try drilling without the jig but this way it ends up looking a little
but this way it ends up looking a little
but this way it ends up looking a little more professional now if we had a bit of
more professional now if we had a bit of
more professional now if we had a bit of wood glue to the sides that touch press
wood glue to the sides that touch press
wood glue to the sides that touch press them firmly together then drive a screw
them firmly together then drive a screw
them firmly together then drive a screw into the holes we made
into the holes we made
into the holes we made it’ll fasten the boards together cleanly
it’ll fasten the boards together cleanly
it’ll fasten the boards together cleanly and very securely now just for fun let’s
and very securely now just for fun let’s
and very securely now just for fun let’s head to the router station and try using
head to the router station and try using
head to the router station and try using a keyhole bit to make a slot for hanging
a keyhole bit to make a slot for hanging
a keyhole bit to make a slot for hanging the frame on the wall if you want to see
the frame on the wall if you want to see
the frame on the wall if you want to see how I made this router table see if you
how I made this router table see if you
how I made this router table see if you can find it in a previous project now
can find it in a previous project now
can find it in a previous project now I’m going to try clapping down a
I’m going to try clapping down a
I’m going to try clapping down a straight edge and marking where the
straight edge and marking where the
straight edge and marking where the center of the bit lines up and if we
center of the bit lines up and if we
center of the bit lines up and if we mark a two inch section across the
mark a two inch section across the
mark a two inch section across the middle of the frame you can see now that
middle of the frame you can see now that
middle of the frame you can see now that when the router is spinning we’re able
when the router is spinning we’re able
when the router is spinning we’re able to slowly press the board down flat on
to slowly press the board down flat on
to slowly press the board down flat on the table and carefully follow the
the table and carefully follow the
the table and carefully follow the markings to cut out a recess groove on
markings to cut out a recess groove on
markings to cut out a recess groove on the back side I chose to lift it
the back side I chose to lift it
the back side I chose to lift it straight up to finish the cut and
straight up to finish the cut and
straight up to finish the cut and hopefully from this angle you can see
hopefully from this angle you can see
hopefully from this angle you can see what it did the head of a screw can
what it did the head of a screw can
what it did the head of a screw can enter but then it’s held securely on the
enter but then it’s held securely on the
enter but then it’s held securely on the inside of the groove okay let’s try
inside of the groove okay let’s try
inside of the groove okay let’s try swapping out the keyhole bit for a
swapping out the keyhole bit for a
swapping out the keyhole bit for a half-inch rabbeting bit
half-inch rabbeting bit
half-inch rabbeting bit it if we follow the inside Ridge of the
it if we follow the inside Ridge of the
it if we follow the inside Ridge of the frame you can see it cuts a half-inch
frame you can see it cuts a half-inch
frame you can see it cuts a half-inch channel where we can fit the picture and
channel where we can fit the picture and
channel where we can fit the picture and glass later on while we’re here let’s
glass later on while we’re here let’s
glass later on while we’re here let’s try cutting a groove around the outer
try cutting a groove around the outer
try cutting a groove around the outer edge as well and this is just to make
edge as well and this is just to make
edge as well and this is just to make them pop out a little more alright the
them pop out a little more alright the
them pop out a little more alright the edges are looking good but still a
edges are looking good but still a
edges are looking good but still a little rough with splinters but you can
little rough with splinters but you can
little rough with splinters but you can see a little sanding we’ll clean it up
see a little sanding we’ll clean it up
see a little sanding we’ll clean it up quickly and easily now instead of using
quickly and easily now instead of using
quickly and easily now instead of using real glass to protect the picture I’m
real glass to protect the picture I’m
real glass to protect the picture I’m going to try Plexiglas instead you might
going to try Plexiglas instead you might
going to try Plexiglas instead you might remember in a previous project I took
remember in a previous project I took
remember in a previous project I took the screen off an old TV and use one of
the screen off an old TV and use one of
the screen off an old TV and use one of the layers to create a giant solar
the layers to create a giant solar
the layers to create a giant solar scorcher which was used for all sorts of
scorcher which was used for all sorts of
scorcher which was used for all sorts of projects but there were still two other
projects but there were still two other
projects but there were still two other layers to the screen one of which was a
layers to the screen one of which was a
layers to the screen one of which was a clear sheet of Plexiglas now I tried
clear sheet of Plexiglas now I tried
clear sheet of Plexiglas now I tried using a belt standard around the edges
using a belt standard around the edges
using a belt standard around the edges so it fit the frame and now we can use
so it fit the frame and now we can use
so it fit the frame and now we can use it as a template on the picture frame
it as a template on the picture frame
it as a template on the picture frame matting to trace the edges and cut it to
matting to trace the edges and cut it to
matting to trace the edges and cut it to fit if we tape the picture to the back
fit if we tape the picture to the back
fit if we tape the picture to the back and take a look you can see the beveled
and take a look you can see the beveled
and take a look you can see the beveled inner edges are already starting to make
inner edges are already starting to make
inner edges are already starting to make the picture pop alright it’s time to
the picture pop alright it’s time to
the picture pop alright it’s time to finish the frame I have this can of Onyx
finish the frame I have this can of Onyx
finish the frame I have this can of Onyx black paint from a previous project and
black paint from a previous project and
black paint from a previous project and I decided to go ahead and just brush one
I decided to go ahead and just brush one
I decided to go ahead and just brush one thick coating making sure to cover the
thick coating making sure to cover the
thick coating making sure to cover the sides as well now we can leave this to
sides as well now we can leave this to
sides as well now we can leave this to dry for a couple of hours and when we
dry for a couple of hours and when we
dry for a couple of hours and when we come back the frame is actually looking
come back the frame is actually looking
come back the frame is actually looking pretty good we could stop here but I
pretty good we could stop here but I
pretty good we could stop here but I want to use a bit of sandpaper to rough
want to use a bit of sandpaper to rough
want to use a bit of sandpaper to rough up the edges and give it a bit of a
up the edges and give it a bit of a
up the edges and give it a bit of a distressed look this way when it gets
distressed look this way when it gets
distressed look this way when it gets beaten up over time it’ll still look
beaten up over time it’ll still look
beaten up over time it’ll still look just as good alright the frame is
just as good alright the frame is
just as good alright the frame is finished so now we can insert the
finished so now we can insert the
finished so now we can insert the Plexiglas the picture and a wooden
Plexiglas the picture and a wooden
Plexiglas the picture and a wooden backing to keep it together and press it
backing to keep it together and press it
backing to keep it together and press it all flat to secure the backing in place
all flat to secure the backing in place
all flat to secure the backing in place I’m going to try shooting some Brad
I’m going to try shooting some Brad
I’m going to try shooting some Brad nails at a bit of an angle into each of
nails at a bit of an angle into each of
nails at a bit of an angle into each of the four corners then pressing them down
the four corners then pressing them down
the four corners then pressing them down flat as well at this point our picture
flat as well at this point our picture
flat as well at this point our picture frame is completely finished my little
frame is completely finished my little
frame is completely finished my little boy gave his approval and we decided to
boy gave his approval and we decided to
boy gave his approval and we decided to hang it on one of the prominent walls of
hang it on one of the prominent walls of
hang it on one of the prominent walls of the play room the same place where it
the play room the same place where it
the play room the same place where it hangs to this day now these frames are
hangs to this day now these frames are
hangs to this day now these frames are so simple and easy to make and have such
so simple and easy to make and have such
so simple and easy to make and have such a modern and elegant feel to them that I
a modern and elegant feel to them that I
a modern and elegant feel to them that I went ahead and made a whole bunch more
went ahead and made a whole bunch more
went ahead and made a whole bunch more and frame some of the other pictures in
and frame some of the other pictures in
and frame some of the other pictures in our house so sure you need a few tools
our house so sure you need a few tools
our house so sure you need a few tools to make them but I got most of mine ii
to make them but I got most of mine ii
to make them but I got most of mine ii had a garage sales and the savings on
had a garage sales and the savings on
had a garage sales and the savings on just a couple of these homemade frames
just a couple of these homemade frames
just a couple of these homemade frames more than made up the difference well
more than made up the difference well
more than made up the difference well now you know how to turn a simple piece
now you know how to turn a simple piece
now you know how to turn a simple piece of common board into modern and
of common board into modern and
of common board into modern and decorative picture frames that are super
decorative picture frames that are super
decorative picture frames that are super low cost to build make your favorite
low cost to build make your favorite
low cost to build make your favorite pictures stand out in style and show the
pictures stand out in style and show the
pictures stand out in style and show the people that painted them that their work
people that painted them that their work
people that painted them that their work is appreciated
is appreciated
is appreciated well that’s it for now if you liked this
well that’s it for now if you liked this
well that’s it for now if you liked this project perhaps you’ll like some of my
project perhaps you’ll like some of my
project perhaps you’ll like some of my others check them out at the king of
others check them out at the king of
others check them out at the king of random comm hey before you go please
random comm hey before you go please
random comm hey before you go please take a second to support my efforts by
take a second to support my efforts by
take a second to support my efforts by clicking the link in the description for
clicking the link in the description for
clicking the link in the description for audible.com
audible.com
audible.com they’re amazing supporters of my videos
they’re amazing supporters of my videos
they’re amazing supporters of my videos and are still offering a free audiobook
and are still offering a free audiobook
and are still offering a free audiobook when you sign up for their service which
when you sign up for their service which
when you sign up for their service which is awesome because I’m reading and
is awesome because I’m reading and
is awesome because I’m reading and recommending a book called the power of
recommending a book called the power of
recommending a book called the power of self confidence by Brian Tracy it
self confidence by Brian Tracy it
self confidence by Brian Tracy it teaches how to be successful in whatever
teaches how to be successful in whatever
teaches how to be successful in whatever you choose to do and to achieve things
you choose to do and to achieve things
you choose to do and to achieve things you never would have imagined as a
you never would have imagined as a
you never would have imagined as a father of three these are principles I’m
father of three these are principles I’m
father of three these are principles I’m trying to teach my kids but if that’s
trying to teach my kids but if that’s
trying to teach my kids but if that’s not your style audible.com has over a
not your style audible.com has over a
not your style audible.com has over a hundred and fifty thousand other titles
hundred and fifty thousand other titles
hundred and fifty thousand other titles to choose from so chances are you’ll
to choose from so chances are you’ll
to choose from so chances are you’ll find one that’s perfect for you so why
find one that’s perfect for you so why
find one that’s perfect for you so why not take a second to look around
not take a second to look around
not take a second to look around audible.com slash the king of random it
audible.com slash the king of random it
audible.com slash the king of random it really helps support these videos and
really helps support these videos and
really helps support these videos and you might just find a book that takes
you might just find a book that takes
you might just find a book that takes your way of thinking to the next level
”
Be First to Comment