00:00:10a fun little handgun that will shoot
00:00:11projectiles with power and precision in
00:00:14this video we’ll be converting these
00:00:15traps into affordable little firearms
00:00:20[Music]
00:00:27you
00:00:28[Music]
00:00:32I picked up this 2-pack of traps for
00:00:36only 98 cents these are the Tomcat brand
00:00:38and I chose them because of this yellow
00:00:40bait pad that I’ll be using later I got
00:00:42a piece of two by two and cut it to the
00:00:44height of four fingers and that’s going
00:00:45to be my handle to modify these traps
00:00:47we’ll get them out of the packaging and
00:00:49start by removing the bait pad from this
00:00:51heavy-duty support staple and setting it
00:00:53to the side using some needlenose pliers
00:00:55we can remove the staple from the base
00:00:57and grab a marker we’re going to need to
00:00:59place some dots over the cat’s
00:01:00heel bone the elbow and one where the
00:01:02ear meets the eye a drill in an eighth
00:01:04inch bit will help turn those dots into
00:01:06holes that should end up looking like
00:01:08this I’ve got two screws from a door
00:01:10hinge that will work well for fastening
00:01:12the trap onto the top of the wood handle
00:01:13the back overhangs about quarter-inch
00:01:15and when the screws are set the trap is
00:01:17secure now the locking pin will need to
00:01:19be shortened so holding it over the
00:01:21spring and looking down from the top a
00:01:23mark is made so that it lines up just
00:01:25past the remaining hole the snips and my
00:01:27pliers will cut that to size and I’m
00:01:29double-checking that the length is good
00:01:30by holding it next to the hole it’s
00:01:32pretty much flush with the edge so I’ll
00:01:34finish it off by bending the tip back
00:01:35just a touch so it angles up at about 45
00:01:38degrees the other trap still has a
00:01:39locking pin that can be easily removed
00:01:41and used to help form the trigger for
00:01:43the pistol this hole is just large
00:01:45enough to allow the trigger to pivot
00:01:46freely on the top side I’ll cut the pin
00:01:49flush with the spring and then bend it
00:01:51over forming a hook shape this will
00:01:52prevent it from slipping back through
00:01:54the hole there’s only one thing left to
00:01:56do and that’s to add this launching pad
00:01:57so with the hooks facing up it gets
00:01:59clipped onto the trap hammer and slid
00:02:01all the way to the right side then we
00:02:03simply lift the hammer up and tuck the
00:02:04pad inward so it lays down flat on the
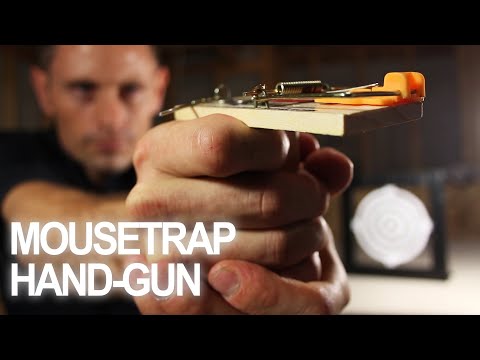
00:02:06platform this mousetrap handgun is
00:02:09finished and ready for testing setting
00:02:11the firing mechanism works about the
00:02:12same as setting the trap only this time
00:02:14we push the trigger up from the bottoms
00:02:16the hook slides over the locking pin
00:02:18catching it in place it’s a three-step
00:02:20process to pull the hammer back set the
00:02:22pin and secure it with the trigger hook
00:02:24by squeezing the trigger gently you can
00:02:26watch the catch slide off the pin
00:02:28causing the gun to fire
00:02:30it’s time to add some ammo and these
00:02:32airsoft BB’s hold perfectly in the
00:02:34center groove a quick test proves a fire
00:02:36straight ahead so I’ve made a little
00:02:37target for practice these things are
00:02:39pretty fast and I’m a little surprised
00:02:41the pellets aren’t penetrating the paper
00:02:43even when shot at close range to address
00:02:46that problem I’m putting pellets on
00:02:47every hole to attempt a shotgun approach
00:02:49that’s a lot more dramatic and the
00:02:52spread is about 70 degrees so it’s
00:02:54obviously more effective closer up with
00:02:56a bit of practice it’s pretty easy to
00:02:57set but if you’re feeling lazy you could
00:03:00just hold the hammer back with your
00:03:01thumb and release when you feel like it
00:03:02this also opens up an option for a
00:03:05rapid-fire approach make sure you stay
00:03:08well back when firing because there’s a
00:03:10real danger of losing an eye when the
00:03:12locking pin snaps back and hits you all
00:03:14right for a little variety I placed a
00:03:16penny on the launch pad and it’s a
00:03:18powerful shot back at my makeshift
00:03:20target range I’m interested to see if
00:03:22the penny does any better than the
00:03:23airsoft BB’s and that’s a definite yes
00:03:26the gun shoots straight ahead by moving
00:03:28the ammo forward on the pad because the
00:03:30targets are lower and this is
00:03:32essentially a handheld mini catapult
00:03:34it’s obvious that the coins get the job
00:03:36done and are surprisingly consistent by
00:03:38sliding the penny further back the
00:03:40launch angle is shifted upward and
00:03:41targets higher up can be hit even when
00:03:43the gun is held level I experimented
00:03:45with other sources of ammunition like
00:03:47this metal washer a glass pebble a
00:03:50bracelet bead bottle cap and found that
00:03:54pretty much anything small and dense
00:03:56like a little stone gave satisfying
00:03:57results I made some more guns and
00:03:59painted this one black because I like
00:04:01how that contrasted against the yellow
00:04:03launch pad well now you know how to make
00:04:05a powerful handheld mousetrap gun or
00:04:07maybe two if you’re feeling ambitious
00:04:08that’s it for this project if you
00:04:10enjoyed this video please like comment
00:04:12and share with your friends I appreciate
00:04:15your support thanks for watching
00:04:17[Music]
”